


New Car
Explore all New Cars of 2024
When you think of navigation on you motorcycle, what are the options that come to your mind? Very few, right? For most people, it involves getting a phone mount, putting your phone in there, and just using Google Maps. But there are some inherent problems here. Primarily, battery life, as our current smartphones just don’t last long, especially with the screen on. And secondly, even if you’ve got a phone charger on your bike, given our hot weather, if you keep the phone running in direct sunlight for a couple of hours, there’s a good chance that it’s going to shut down, thanks to overheating.
But then, is there a solution? The good folks at Maximus think that they do have one. Enter Maximus Pro, a system of products designed to provide the experience of navigation on a motorcycle distilled down to its very basics. And to top it off, it also gets a very secure bike tracker with an anti-theft system.
What’s in the box?
Display Module
Carrying pouch
Micro USB charging cable
Handlebar mount
Rubber adapters
Allen key
Connectivity Module
T-tap connectors
Zip ties
Attaching the Display Module
This is the easiest part of job. The display module fits on the bike’s handlebar using the handlebar mount that comes in the box. A special mention needs to be made about this mount, as it’ really well constructed. In fact, the quality of plastics involved here are far superior than any of the other handlebar mounts I’ve encountered so far.
The display module attaches using a standard tripod screw, so technically you could use it to mount any other type of device too (such as an action camera). The knurled bottom part of the screw is big enough and has adequate grip that you can rotate it even with gloves on. Just one thing to note here is the fact that the mount only works with regular handlebars. So if you wanted to use the display module on a bike with clip-on bars, you might be out of luck.
Attaching the Connectivity Module
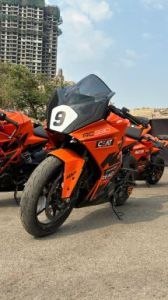
Ok, even though you can totally DIY this bit, it isn’t as easy as fixing the handlebar mount. First of all, you need to find adequate space for the module. On my 2013 KTM 390 Duke, there was ample space under the seat (once I had moved my toolkit to my backpack), but I did need to use zip ties to secure to secure the unit in place. Connecting the battery wires is as simple as it gets, and the connectivity module comes with wires that are long enough to easily reach the battery.
Then comes the slightly complicated process of identifying which wire from the fuse box goes to the ignition fuse. Once that’s out of the way, using the T-tap connector, you need to hook up the “For Ignition” wire from the connectivity module to it. This enables the connectivity module to understand when the ignition is turned on or off. After that, it’s just a question of tucking away the excess wires and you’re done.
Using Maximus for navigation
The third part of the whole Maximus ecosystem is the smartphone app, which connects to the Display Module using Bluetooth. To start a journey, simply enter a destination in the app, and you can rest assured that you can find most destinations as Maximus is actually using Google Maps. Once you’ve picked the destination, the app shows you an interactive route with all petrol pumps, restaurants and hotels highlighted along the way.
You can simply click on any of these and add them to your route. You can even add multiple waypoints (up to 10) along your journey if you want to break up your journey. Once you’re all set, this route gets pushed to your Display Module, and you’re ready to navigate.
Now the navigation experience isn’t as intuitive as following Google Maps on your phone, as all the display module will show you is what turn is coming up and the distance to that turn - essentially just the symbology that you see in the top left of the Google Maps display.
The advantages of using Maximus
Firstly, the Display Module (DM) is a rugged piece of equipment that’s meant to handle far more abuse than your smartphone can. So whether you’re riding in extreme temperatures or pouring rain, the DM can handle it all. Then, it’s 2.7 inch E-Ink display barely consumes any battery power, and the good folks at Maximus claim that it can easily last for two days of riding. In our testing stint, the longest unbroken ride we did while navigating with the DM was about 7-8 hours. And even after that, the DM was showing approx 60 percent battery remaining. So we have no problem in believing that the battery will actually last for two days of riding. It’s got a great standby time as well, which the DM still holding a majority of it original charge even after two weeks of no use. Another advantage of that E-Ink display is excellent legibility in direct sunlight, and there’s even a backlight that automatically goes on after 5:00pm so you can navigate in the dark as well.
But the biggest advantage of using the DM for navigation is that thanks to its simplified directions and instructions, it proves to be far less distracting than having your smartphone mounted to your handlebars. Thanks to its large, friendly typeface, just a quick glance is enough to ascertain what turn is coming up and how far you have to travel to get to that turn (once you learn how to read it that is, but we’ll get to that in a bit).
There’s some smartness built into the system too. In case you go off the planned route, and you have data connectivity on your phone, the app will automatically reroute and push the new route to your DM. And in case you don’t have data connectivity, the DM will show you a compass arrow pointing to where you went off-track and an approximate distance to that point. You can then just follow the arrow to get back to your original route.
The DM has some other unique features too. There’s an option of sending several types of messages to your riding group at the touch of a button (provided they’re using the Maximus system, and have been added into your ride). You can alert your buddies of an accident, severe conditions, no fuel or a puncture simply by tapping the button on the DM and selecting the appropriate message.
Is it all sunshine and rainbows?
No. As we mentioned before, the DM just shows the basic guidance symbology that you get in the top left corner of your Google Maps display. So there is a bit of learning curve involved in navigating with it. Most of our roads aren’t really aligned in grids, or any logical arrangement for that matter. So correlating the turn symbol the DM shows to the actual shape of the turn that’s coming up isn’t the easiest thing in the world.
Then there were a couple of specific problems we encountered too, especially when navigating in the urban environment. If there’s a turn you have to take under a flyover, the DM doesn’t, and can’t, usually specify that you need to get on to the service road first for the upcoming turn. If you follow what instructions it gives to the T, you’ll then be on the middle of the flyover with the distance to turn counted down to zero, followed by the system declaring that you’re off track. Then there’s the scene of the distance to turn indicator wanting to count all the way down to zero before giving you the next turn. And that zero point is usually mid turn, which means you’re usually at the actual turn point with the DM reading 20-30 metres.
Dude, where’s my bike?
With the connectivity module installed in your bike, you get a real time update of your bike’s location on the Maximus app. On top of that, if the bike is moved a certain distance without the ignition being switched on, you get an alert not only on the Maximus app, you also get an SMS alert for the same.
This is a very useful feature if you’re parking your expensive motorcycle in a location that’s not very secure. The connectivity module manages this bike tracking thanks to the GSM SIM card which it comes pre-installed with. And your one time purchase of the device gives you one year subscription to the SIM’s data services.
Achievement unlocked
There are some fun features here too, which should really appeal to the gamers. The Maximus app features some achievements which can be achieved by crossing certain thresholds while riding, such as clocking over a certain speed, maintaining a certain average speed, covering a certain number of kilometres in total.
While these achievements don’t really do anything to enhance the navigation experience, the are quite fun to complete and can also give you some bragging rights.
Who is Maximus for?
At Rs 12,999 for both the Connectivity Module and the Display Module together, the Maximum system isn’t cheap by any means. But it offers a refined navigation experience combined with a security system that’s really a must for anyone who likes to travel long distances on their motorcycle. And the benefits of using Maximus for navigation are increased manifold when the system is used by multiple riders in a single group. Of course, for those who want just the DM, Maximus offers that separately as well.
India's largest automotive community