 2026 Renault Duster Hybrid Bookings Open: Fuel Efficiency Figures Revealed
Do it Yourself : Tubeless tyre puncture repair kit
- Published February 9, 2012
- Views : 159990
- 2 min read
-

-

-
 Follow us
Here's a quick fix solution to repairing a puncture on a tubeless tyre without having to bolt on the spare wheel or take off the wheel from the hub
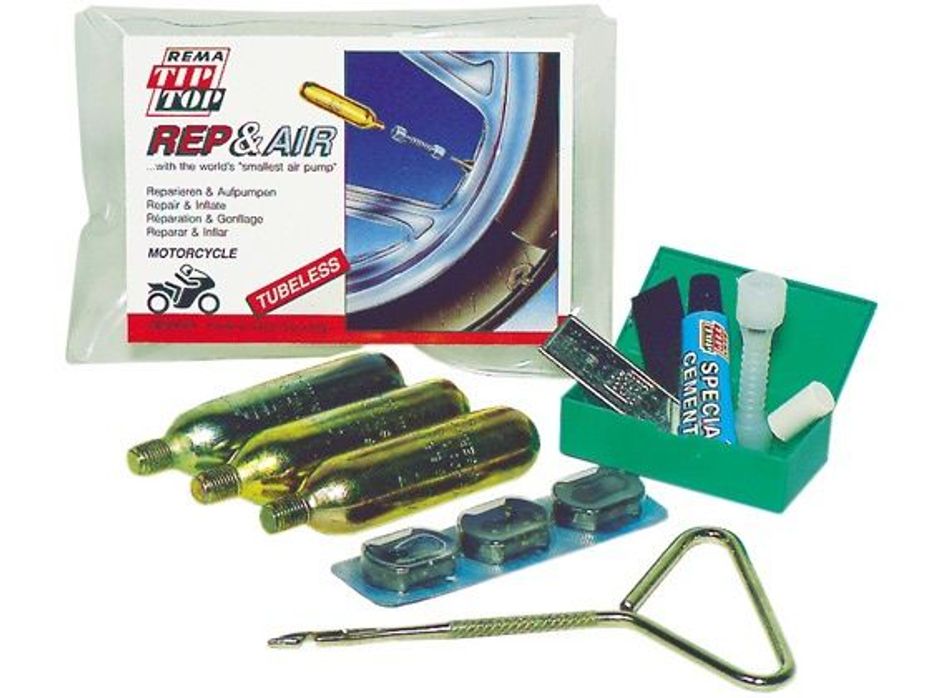
Over the years, better quality tyres have reduced the possibility of a flat tyre though they aren’t entirely avoidable. It is best to be prepared against such eventualities to avoid the hassle of changing tyres.
In the case of tubeless tyres, one can use puncture repair kits that come with the tyres or can be bought off the shelves from any tyre shop. These kits usually comprise a spiral tool, an inserting tool, a strip of puncture seals, a tube of rubber cement and a sharp blade. Some kits also have additional tools such as compressed air canisters with covers, valve adapter, etc. Besides, it will be a good idea to buy an electronic tyre inflator.
Here’s a step-by-step guide to repairing a punctured tubeless tyre.
1. Inflate the tyre and locate the puncture by checking for any sharp objects like nails or glass shards.
2. Remove the foreign object and any other things that may be sticking out of the tyre.
3. Take the spiral tool and drive it into the puncture in a clockwise manner. This will make it easier to insert the puncture strip.
4. Remove a puncture seal from the strip, feed it through the inserting tool like a needle and thread.
5. Once the seal strip is equal on both sides of the inserting tool, take the tube of rubber cement and apply it to the centre of the seal strip. The inserting tool has a little gap at the bottom that will allow the seal strip to be left behind inside the tyre.
6. Remove the spiral tool from the tyre and insert the inserting tool with the seal strip. The inserting tool will not go all the way in. It will stop after the plastic bit of the handle touches the tyre after which it can be pulled out. At this point, the seal strip will be left inside the tyre blocking the hole in the tyre.
7. The sharp blade should then be used to cut off the ends of the seal strip sticking out of the tyre for an even contact patch for the tyre.
8. Set the appropriate tyre pressure on the tyre inflator and inflate the tyre.
The tyre is now repaired with the vehicle ready to be driven but do get the tyre checked up at a repair shop.
NOTE: ALL PUNCTURE REPAIR SHOULD BE RESTRICTED TO THE TREAD AREA ONLY AND NEVER EVER ON THE SIDEWALL.
Add Your Comments


See what our community has to say! NEW
India's largest automotive community
Explore Now

Latest Cars
-
 Skoda Slavia
₹ 10.00 Lakh
Skoda Slavia
₹ 10.00 Lakh
-
Honda Elevate
₹ 11.80 Lakh
-
Mercedes-Benz Maybach S-Class
₹ 3.35 Crore
-
Tata Aeris
₹ 5.30 Lakh
-
Mahindra Thar OG
₹ 10.32 Lakh
Upcoming Cars in India
-
Volvo EX90
Rs. 1.20 Crore
Launch : Oct 12, 2026 -
Volvo ES90
Rs. 1.10 Crore
Launch : Oct 12, 2026 -
Toyota Glanza Facelift
Rs. 6.85 Lakh
Launch : Oct 14, 2026 -
Hyundai Bayon
Rs. 10.00 Lakh
Launch : Oct 15, 2026 -
Audi Q3 2026
Rs. 48.00 Lakh
Launch : Oct 16, 2026
- Latest
- Popular
-
2026 Renault Duster Hybrid Bookings Open: Fuel Efficiency Figures Revealed
-
 Tata Aeris Petrol And CNG Review: Successful Reinvention
-
 Top 5 Things We Love About The Skoda Slavia Facelift
-
 2026 Honda Elevate Facelift Launched At Rs 11.80 Lakh! Honda Finally Adds These Missing Features
-
2026 Skoda Slavia Facelift Launched At Rs 9.99 Lakh! Gets Massaging Seats And Better Fuel Economy!
Top Expert Reviews
-
MG Astor First Drive Review: Standing Out In Style
-
2021 Mahindra XUV700: First Drive Review
-
Kia Sonet Driven: More Than Just A Great Brochure?
Best Cars
-
Tata Nexon
Rs. 7.40 Lakh1199 cc | 17.4 kmpl | 118.3 bhp
-
Hyundai Creta
Rs. 10.91 Lakh1497 cc | 17.4 kmpl | 113.2 bhp
-
Kia Seltos
Rs. 11.00 Lakh1497 cc | 113 bhp
-
Hyundai Venue
Rs. 8.00 Lakh1197 cc | 18.5 kmpl | 82 bhp
-
Mahindra Thar ROXX
Rs. 12.52 Lakh1997 cc | 12.4 kmpl | 160 bhp
×